Author: Narender Singh

Myself Narender Singh Thakur ( NST ) and i share my Experience/Knowledge and Tricks for folks and beginners to solve their issues while making websites through this Planet.

How can I disable Email Summaries in WPForms WordPress plugin ?

So here are the other Queries related to this Topic …..

  1. WPForms plugin .. how to disable email notification of summaries.
  2. How To disable Weekly WPForms Summary emails.
  3. I want to disable notification from WP plugin WPForms Summary reports.
  4. In WPForms plugin how to stop receiving summary reports.

Here is the solution to disable WPForms Email Summaries…

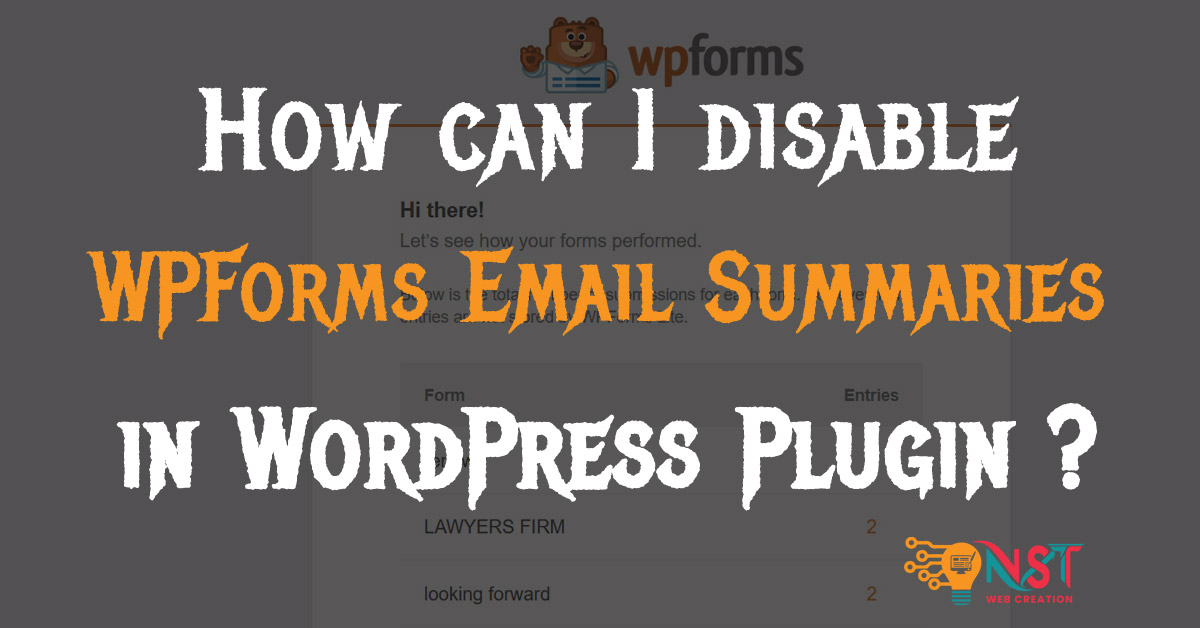
When we are using wpforms plugin for contact etc forms in wordpress… it usually sent us weekly summary reports for the forms submitted.

Like below…

Your Weekly WPForms Summary for nstwebcreation.com

Your Weekly WPForms Summary for nstwebcreation.com

So to stop this Emails….

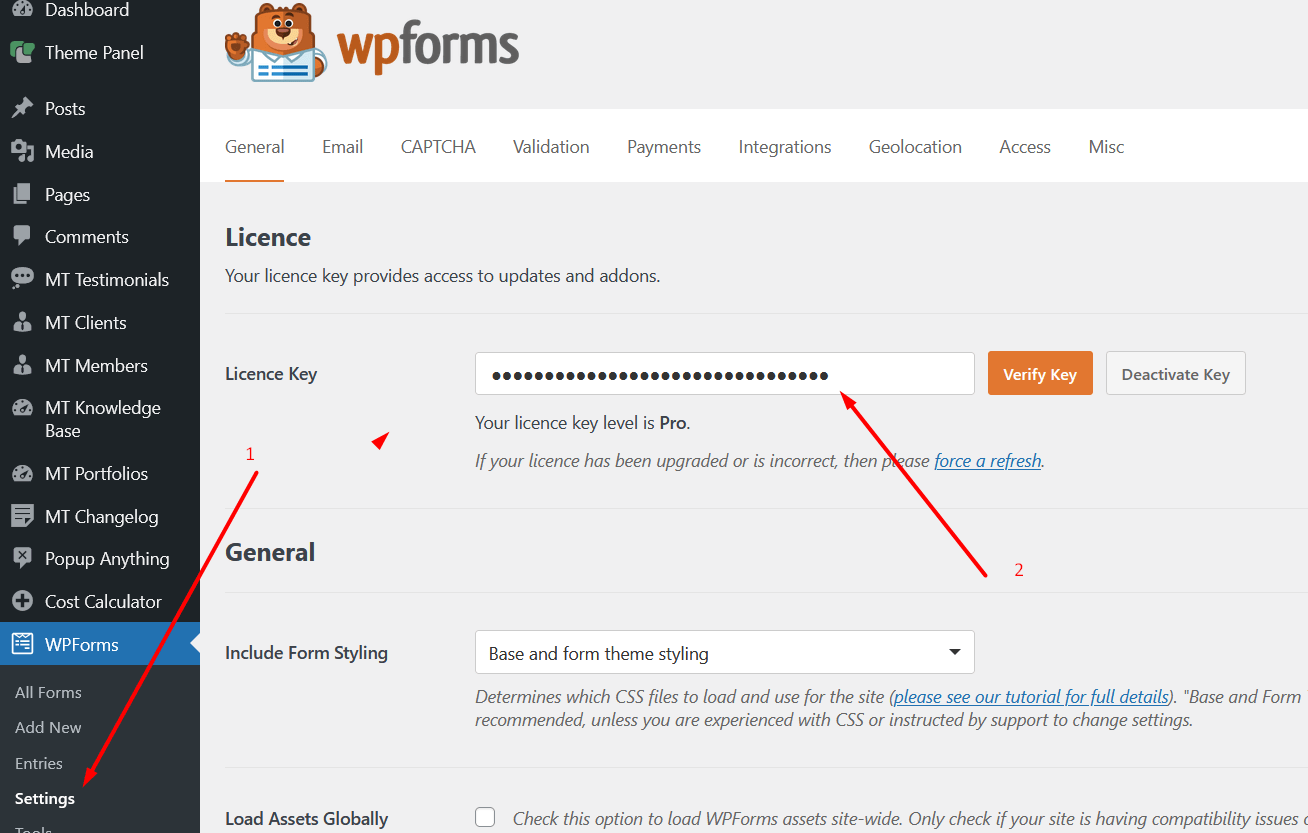
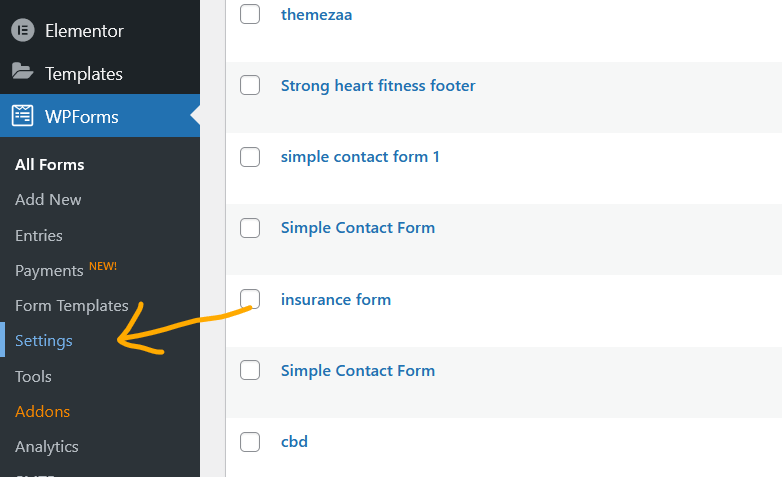
Login to wp dashboard and under WPForms click on Settings.. as shown below..

WPForms click on Settings

Next window will be like this.. Click on Misc as shown below…

Click on Misc as shown below

Scroll down to near this and check this checkbox.. Disable Email Summaries ..

Disable Email Summaries

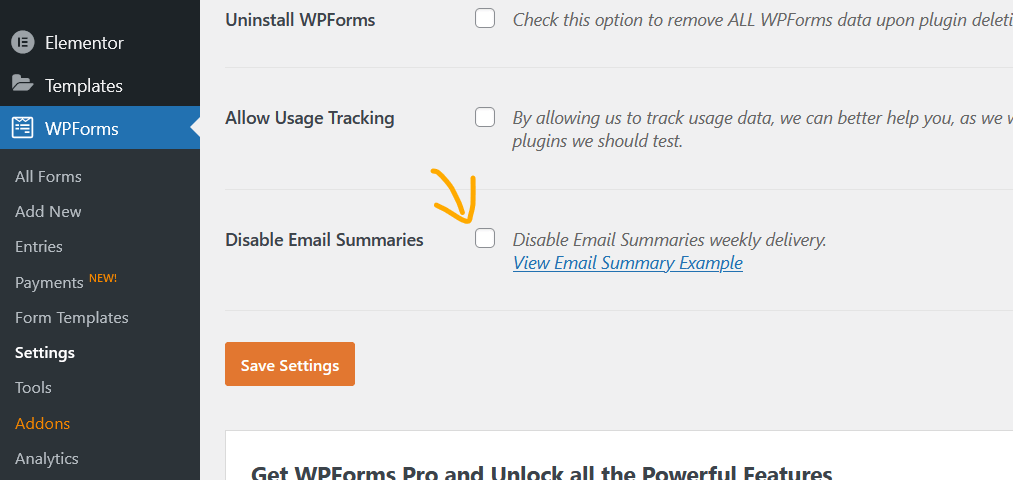
After Check …click on Save settings to save this changes..

Disable Email Summaries save settings

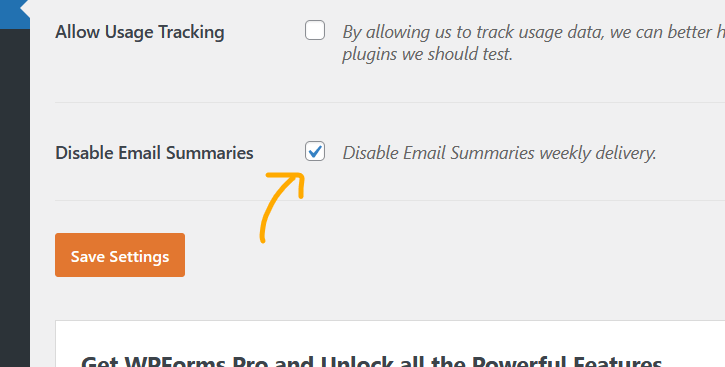
Like this you can disable Email Summaries weekly delivery of wpforms plugin.

I hope this article helped you to learn how to disable Email Summaries of wpforms plugin in WordPress.

If you need any further help please contact me with contact form or chat box or other way i added in the website.

Thanks πŸ™‚

How to add blog post in WordPress website ? (Step by Step)

To add a new post in WordPress, follow these steps:

  1. Log in to your WordPress dashboard: Go to your WordPress website’s admin panel by visiting: https://www.yourwebsite.com/wp-admin/. Enter your username and password to log in.
  2. Access the “Posts” section: In the WordPress dashboard, you will see a menu on the left-hand side. Look for “Posts” and click on it. This will take you to the posts management section.
  3. Click on “Add New”: Once you are in the “Posts” section, you’ll see a button labeled “Add New.” Click on it to start creating a new post.
  4. Enter the post title: In the editor, you’ll see a field where you can enter the title of your post. Type in the title you want to give to your new post.
  5. Write the post content: Below the title, you’ll find the main editor area. This is where you can write your post content. You can use the visual editor, which is similar to using a word processor, or you can switch to the “Text” tab to write in HTML if you’re familiar with it.
  6. Format your content: Use the editor’s formatting options to create headings, apply bold/italic text, add lists, insert media (images, videos), create links, etc. The editor toolbar contains various tools to help you format your content.
  7. Set post categories and tags (optional): On the right-hand side of the editor, you’ll see options to assign categories and tags to your post. Categories help organize your posts, and tags are like keywords that make it easier to find related content.
  8. Set featured image (optional): In the right sidebar, you’ll find an option to set a featured image for your post. This image represents your post and is often displayed on your website’s homepage or archive pages.
  9. Save your draft: While creating your post, it’s a good idea to save it as a draft periodically. Look for the “Save Draft” button on the right side of the editor or the “Save Draft” option in the “Publish” meta box.
  10. Preview your post (optional): To see how your post will look on the website before publishing, you can click the “Preview” button. This will open a new tab with a preview of your post.
  11. Publish your post: Once you’re satisfied with your post, click the “Publish” button. Your post will be live on your website for your visitors to see.

Dashboard of post editor will be something like this if you are using default editor .. if you are using Elementor etc then this window will be different.

If you need any further help please contact me with contact form or chat box or other way i added in the website.

Thanks πŸ™

I Changed the URL of My Website and Elementor Does Not Work Anymore

So here are the other Queries related to this Topic …..

  1. After migration of website .. Elementor images path is not updated.
  2. How To Fix The Error That Elementor Page Builder Does Not Work After Changing The Site’s URL?
  3. How to change Elementor pages images url.
  4. Images url not updated after migrating to new domain or website.
  5. Elementor images not updating after change the site url .

Here is the solution to update the Elementor images url or path..

I Changed the URL of My Website and Elementor Does Not Work Anymore

After you have migrated your website, most likely you changed the URL of your website as well, these are the steps you need to take:

After login to your wordpress website.. in the dashboard…

Go to Elementor > Tools > Replace URL Tab


Enter your old-url and your new-url and click Replace URL button.


Under the General Tab > Regenerate CSS, click Regenerate Files


Like this you can change the elementor images links path.

I hope this article helped you to learn how to change the Elementor images links path in WordPress.

If you need any further help please contact me with contact form or chat box or other way i added in the website.

Thanks πŸ™‚

WooCommerce how to add google conversion tag code to thank you page ?

So here are the other Queries related to this Topic ..

  1. How to add google conversion to woocommerce thank you page.
  2. Woocommerce google ads conversion tracking.
  3. Woocommerce google conversion tracking.
  4. Woocommerce add conversion code to Thank you Your order has been received page.
  5. Add google code to checkout/order-received/ page in woocommerce.

Here is one of the solution for your queries …

Login to your wordpress and Visit to this functions.php file

Click on Appearance >> Theme file Editor >> Theme Funcitons(functions.php) file as below….

wp functions.php file

Scroll to end of the file and enter the code there..

Here is Code… Change the highlighted code with your conversion code…

add_action( 'woocommerce_thankyou', 'nst_tracking_thankyou_page' );
 
function nst_tracking_thankyou_page() {
   ?>

   <!-- Event snippet for #1 - Order Received conversion page -->
<script>
  gtag('event', 'conversion', {'send_to': 'AW-381327****/DmKmCPy*********'});
</script>

   <?php
}

Hit on Save button and this code will be trigger on order-recieved page…

How to check conversion code is showing there on that page or not ?

Please Note the conversion code will not be visible on simple order received page.. like below….

You have to do an temporary order of a product to check that code.. don’t worry about the payment amount… you can create a coupon and can use at checkout for 0 payment.

After fill all the things you can place the order and now the page will be like this…. with thank you message…

This new page include the order id etc and now you can check your code is there by doing right click of mouse and View Page Source. (using keyboard = CTRL+U)

Now you can find the code by keyboard shortcut CTRL + F and add some of code words there….

Like this you can check that the code is working perfectly on the page.

That’s it ..πŸ˜‡

I hope this helps you …. Fell free to contact with us…

Thanks πŸ™

How to hide custom post type link in WordPress Dashboard from side panel ?

So here are the other Queries related to this Topic …..

  • How to hide custom post type options from the wp dashboard ?
  • How to hide custom post type from the wp admin area ?
  • Hide the extra post links from the wp dashboard side panel ?
  • How to disable existing post type in wp dashboard / admin area ?
  • How to remove post type in wp dashboard ?

Sometime we want to hide Post types from the wordpress dashboard … usually this is occur when you use any paid theme …

So here is the way to hide that from the dashboard….

First you have to check the type of the post you want to hide.. like below..

Click on that and copy the last url from the bar….

To remove 1 post type from the dashboard…

function nst_remove_menu_items() {   
        remove_menu_page( 'edit.php?post_type=location' );    
 
}
add_action( 'admin_menu', 'nst_remove_menu_items' );

If you want to remove more than 1 post type then can add that like below:~

function nst_remove_menu_items() {   
    remove_menu_page( 'edit.php?post_type=location' );   
    remove_menu_page( 'edit.php?post_type=testimonial' );
    remove_menu_page( 'edit.php?post_type=mt_blog' );
 
}
add_action( 'admin_menu', 'nst_remove_menu_items' );

That’s it ..πŸ˜‡

I hope this helps you …. Fell free to contact with us… πŸ˜‡

Thanks πŸ™

Vimeo ~ How to apply custom thumbnail to embeded videos ?

So here are the other Queries related to this Topic …..

  1. How to add custom thumbnail to Vimeo video ?
  2. How to add cover photo to Vimeo videos ?
  3. How do you add a thumbnail to an existing video?
  4. Where is the thumbnail button on Vimeo?
  5. How to Change your Create video’s thumbnail Vimeo ?
  6. Vimeo how to apply thumbnail from the uploaded video frame.

Here is the way to add custom thumbnail from the videos in Vimeo …

I embeded a video and its showing me the preview like this…

vimeo video thumbnail

But i want to change this preview to different frame of the video.. so i tried this..

First Login to Vimeo and click on the video that you want to change thumbnail… Like below

vimeo videos

Now Click on the Thumbnail as below….

vimeo thumbnail

Now you have two options ..

1) You can upload the thumbnail by click on upload button.
2) You can choose the particular frame from the video.

First Method :~

upload thumbnail vimeo

Second Method : ~

Click on Select from Video..

vimeo change thumbnail

Play the video…

vimeo play video

Pause the video frame which one you want to choose… like below.. and click on Select this frame.

vimeo select this frame

Select the one you want to apply and hit on Save button..

thumbnail after vimeo

Like this your video thumbnail will be updated and preview will be like this…

after change thumbnail of vimeo embeded video

Final Result ..

before and after result of vimeo video thumbnail

That’s it ..πŸ˜‡

I hope this helps you …. Fell free to contact with us… πŸ˜‡

Thanks πŸ™

How to add product variations in WooCommerce?

So here are the other Queries related to this Topic …..

  1. How to add variable product in WooCommerce ?
  2. How do I get product variation in WooCommerce?
  3. How do you create product variations?
  4. What is product variation?

So First you have to install WooCommerce plugin in you wordpress website and then you can follow the steps given below…

Click on Add New product and add title, description, featured image etc there ..

After that scroll down a little and change the product data from there and choose Variable product.. like below…

After that click on Attributes tab as shown below and choose your created attribute option there… if you don’t know how to add Attribute then follow these simple steps.

Click on Add button after select attribute.

After that new section will be like this… Check the button for Used for variations and click on Select all button as below…

Now you can remove the option from these below .. if your product don’t have any… and then click on Save attributes button.

If you have more options then you can add like below otherwise you can move to Next step …


You can add all the attributes for the products you want to show…

After all these next step to add variations now… like below..

Click on Variations left tabs and then click on Add variation to add one by one ..
or can click on Create variations from all attributes to make all variations there… then click on Go button ..

1 variation i added “3 single” with No option there and price i added 100.

2nd variation i added “3 single” with Yes option there and price i added 150. like below..

Here are both… with Yes and No option….

After Save the changes and publish the product .. the result will be something like this…

Your result option will be all in drop-downs…

With Yes option… price is changed to 150 ….

That’s it ..πŸ˜‡

I hope this helps you …. Fell free to contact with us… πŸ˜‡

Thanks πŸ™

How to add Attributes in woocommerce products wordpress ?

Here are the steps to add “Attributes” in woocommerce…

Click on Attributes tab.. as shown below…

Add the name of the Attribute you want to add there… like Color or Size etc ….

Click on the attribute you added there from right section … For example … i added there “Bed Size” …

Now you can add choices there… like below… if you added color then you can added color name there….

That’s it ..πŸ˜‡

I hope this helps you …. Fell free to contact with us… πŸ˜‡

Thanks πŸ™

WPForms – How to add Polls and Surveys form to wordpress ?

Other Queries related to this Topic ….

  • How to add Quiz form using WPForms plugin ?
  • Can i create Quiz form in wpforms ?
  • How to create form in wordpress ?
  • How to add Survey form to wordrpess ?

So here are the Steps to follow you to create a Poll and survery form in wordrpess using WPForms plugin.

Go to WPForms >> Addons >> add text “poll” to search filed to install this feature in the form.

Note: To use this “Surveys and Polls” feature you have to upgrade your WPForms Plan.. Check below the current price…. this may be vary at the time when you are reading this…

Okay after upgrade the plan you can add Licence Key under the setting of the plugins..like this….

Okay.. so after all these… Click on WPForms and then click on Add New button like below….

After that new window will be like below and give a name to your form as i added in (1) in screenshot and search the form by adding text “poll” like left area text field.. to add a Poll form template there….

Note: Check this topic to add Survery template there in wpforms.

Click on “Use Template” to add this template form or you can check Demo too before adding form there….

After add that template… next window will be like below… now you can edit the content by following the steps mentioned in the screenshot…
1 click on that field.
2 is the area where you can edit things.
3 is for if you want to duplicate the filed.

Check below…

To change the button name …. Click on Button as below…

Then here… you can change your form button name…

After hit on Save button you can embed this form by following 3 method …
1) Using shortcode .
2) By selecting existing page.
3) By adding new page there.


1) Click on Embed button and copy the shortcode like below…and paste this on the page where you want to show the form.

2) Add form by Selecting the existing page option…

Select page from the dropdown list…

3) By creating new page there…

After this … Check the preview of the form…

That’s it ..πŸ˜‡

I hope this helps you …. Fell free to contact with us… πŸ˜‡

Thanks πŸ™

How to add WhatsApp chat html link in website?

Before i start… here are few more queries related to this topic …

  1. How to send whatsapp message through html link.
  2. How to make whatsapp chat link.
  3. How to create whatsapp link for website.
  4. Whatsapp how to use click to chat link
  5. Whatsapp link in html code.
  6. Open whatsapp app from a link in website.

So here is the simple way to add whatsApp chat link in the website..

To show whatsapp icon on the pages .. Follow these steps..

https://wa.me/<Mobile-Number>
where the <Mobile-Number> is a full phone number in international format.

Like if your Mobile Number is 8360723971 then use full number +918360723971

https://wa.me/+918360723971

If you want to add text too the do like this….

https://wa.me/+918360723971?text=<Your-Text>

https://wa.me/+918360723971?text=Hi%20NST%20Web%20Creation

Here %20 is used to add space in between words.
So Full URL will be like this..

<a href="https://wa.me/+918360723971?text=Hi%20NST%20Web%20Creation">+91 8360723971</a>

I have used in my website and icon is used from Font-Awesome website.

<ul>
<li><i class="fa fa-whatsapp" aria-hidden="true"></i> <a href="https://wa.me/+918360723971?text=Hi%20NST%20Web%20Creation">+91 8360723971</a></li>
</ul>
whatsapp link in html

Note : Please change the number and text as per your need.

I hope this will help you … Just contact with me if you need further help!

Thanks πŸ˜ŠπŸ™

Click to Chat