Author: NST

Myself Narender Singh Thakur ( NST ) and i share my Experience/Knowledge and Tricks for folks and beginners to solve their issues while making websites through this Planet.

How to remove WP Statistics data only from the website!

WP Statistics Remove data only … here are the simple steps to removed all your statistics from the dashboard.

Remove the data from wp statistics plugin wordpress ….

wp statistics plugin wordpress

Login to wp Dashboard and visit to Statistics > Optimization.. as below…

wp statistics optimization and purging

In that window click on Purging tab …

wp statistics select table

Now select all option to empty all tables….

wp statistics select all tables

Note :- If the all option is not working then you can delete by choose the tables one by one.….

wp statistics select table one by one

As message shown above…. data is deleted from that particular table…

Delete all and check back by click on Statistics > Overview….

wp statistics data removed

All the tables date deleted now…

Please contact me if you need more help…

Thanks …🙏🙂

Exclude particular category posts by query post in wordpress

Sometime we don’t want to show the posts from the specific category so here is the code that help you to exclude that particular category posts from the posts.


       query_posts(array( 

        'post_type' => 'post',

        'showposts' => 14,
		   
		'category__not_in' => 10,   
		
		 'meta_query' => array(
        'relation' => 'OR',
        array(
            'key' => 'nst_hide_front_post',
            'value' => 'Yes',
            'compare' => '!='
        ),
        array(
            'key' => 'nst_hide_front_post',			
            'compare' => 'NOT EXISTS'
        )
    ),

		'paged' => $paged,	
		

         ) );  

If you still need help then contact with me . 🙂

Thanks 🙏

How to retrieve files path dynamically from child theme wp!

From Child Theme :-

Here is the way to retrieve file path like CSS , JS , Images from child theme in wordpress.

<?php echo get_stylesheet_directory_uri(); ?>

Example:

<link href="<?php echo get_stylesheet_directory_uri(); ?>/css/your-file-name.css" rel="stylesheet">

<img src="<?php echo get_template_stylesheet_uri(); ?>/images/nstplanet.jpg" alt="Nst web creation">

From Parent Theme :-

Here is the way to retrieve file path from main/parent theme in wordpress.

<?php echo get_template_directory_uri(); ?>

Example:

<link href="<?php echo get_template_directory_uri(); ?>/css/your-file-name.css" rel="stylesheet">

<img src="<?php echo get_template_directory_uri(); ?>/images/nstplanet.jpg" alt="Nst web creation">

I hope this helps .. Thanks 🙂

Make Phone Number Field Not Required on Checkout in WooCommerce

Sometime we don’t want Phone number as required on woo-commerce checkout page so here is hook/script that works for this..

add_filter( 'woocommerce_billing_fields', 'wc_nst_filter_phone', 10, 1 );
function wc_nst_filter_phone( $address_fields ) {
$address_fields['billing_phone']['required'] = false;
return $address_fields;
}

Thanks 🙂🙏

How to properly add Google AdSense to your wp website

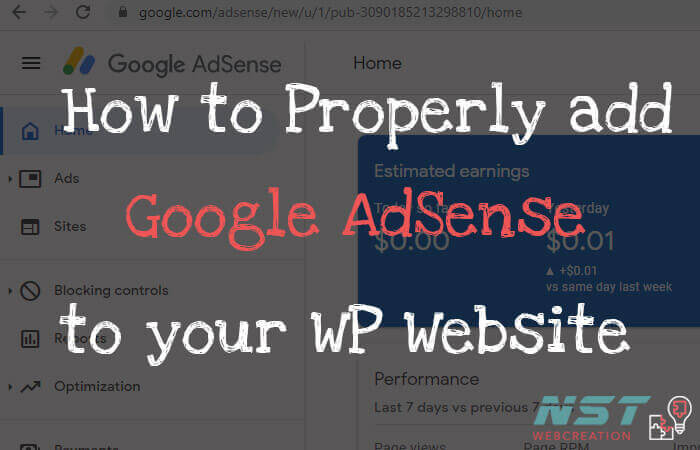
In this article i will help you to add google adsense properly to your wordpress website.

What is Google AdSense?

Google adsense is an online advertising system run by google. It helps bloggers and website owners to earn money online by placing ads on their websites.

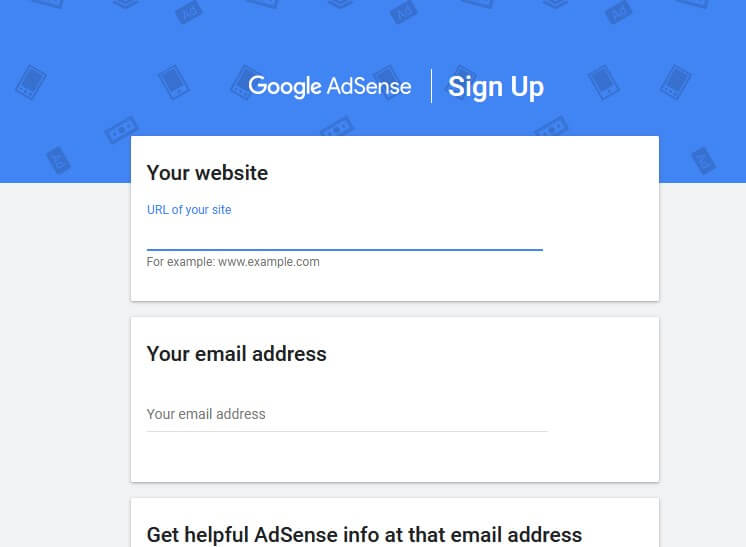
You can sign up on Google AdSense by using your existing gmail account. just sign up there and add the information to complete the registration.

google adSense

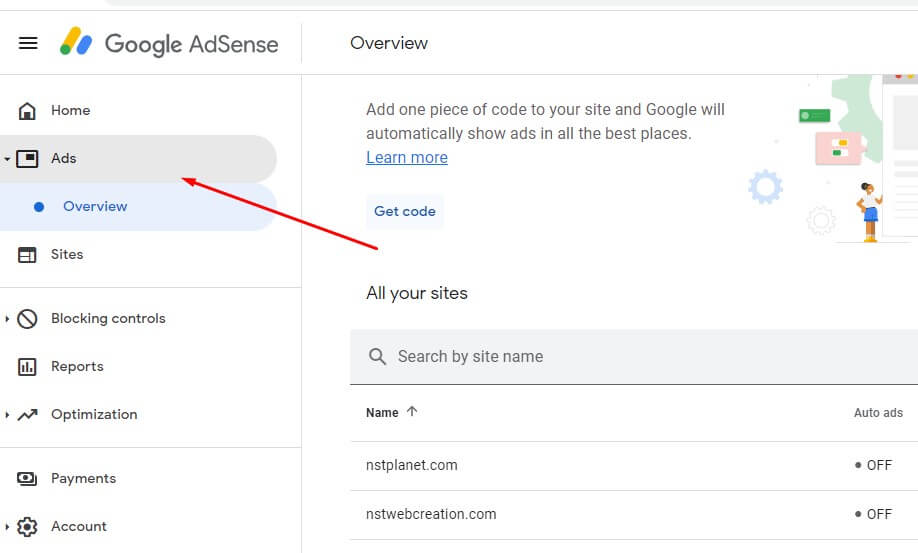
After complete all steps.. you will reached at dashboard.
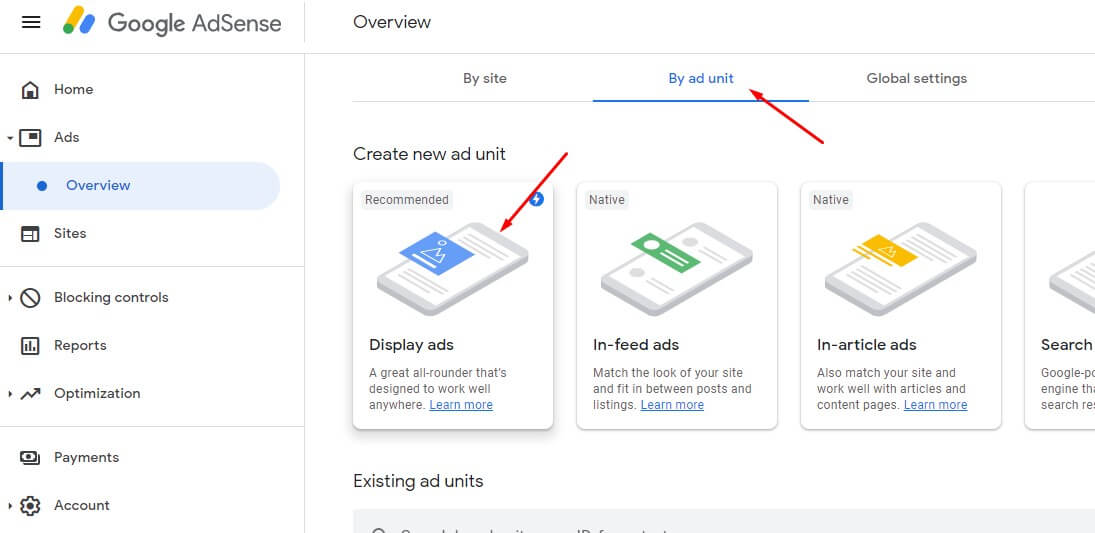
Click on Ads

dashboard of google adsense

Click on By ad unit and then Display ads.

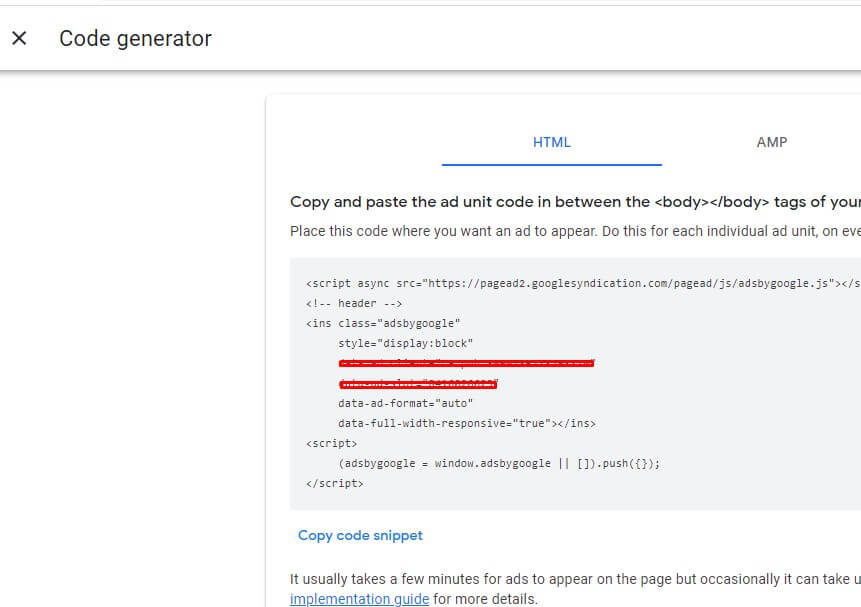
After that in new window… give name to your ad like sidebar ad or header or footer ad etc whatever you like and hit on Save button.

As you can check above .. you can choose the type of ads .. Square , Horizontal and Vertical as per your website layout space.

After this it will show you HTML code .. and now you can copy and add this to your wordpress pages or in dashboard widget area.

html code of ads of google adsense

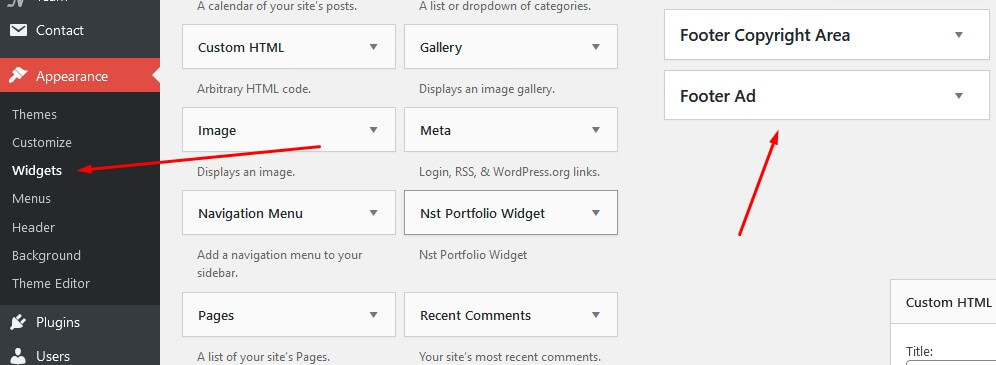
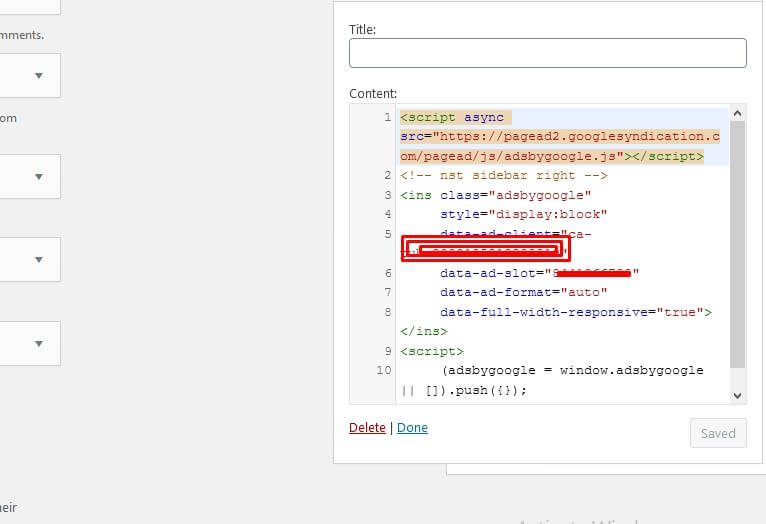
Here i am going to add copied HTML code to widget area’s … you can add wherever you want to show ads.

widget are code adsense

Here is the front view of ads…

NOTICE:-

Ads will not reflect on you website immediately .. it's depend on the traffic on your website. Means how much visitor visits on your website.

I hope this will help you a lot .. if you still need help then you can contact me through chat box or contact form. 🙂

How to check or uncheck checkbox using jQuery

Here is the simple way to check and uncheck checkbox button using jQuery.

check or uncheck checkbox using jquery

1. The example below show that.. on change dropdown option of field.. all the check-boxes will be unchecked .

jQuery('#nst').change(function(){	
  
 jQuery('input:checkbox').each(function() {
   this.checked = false;
 });
});
  

2. The example below show that.. on change dropdown option of field.. all the check-boxes will be checked .

jQuery('#nst').change(function(){	
  
 jQuery('input:checkbox').each(function() {
   this.checked = true;
 });
});
  

checkbox checked

You can use this individually or instead of change function… you can use click function too… as per you need.

Drop a message if you need more help..

Thanks 🙏

How to make backup of your wp websites through cPanel

Here is the way to make backup of your wordpress website and then download from you hosting cPanel.

In other word.. to make backup offline of your website.

Here are few steps to follow :-

Login to your cPanel hosting using url like nstwebcreation.com/cpanel

in place of nstwebcreation.com add your domain name.

cpanel login

Click on “File Manager” option..

file manager

Then new window will be like here..

Follow the steps as per above screenshot ..

1. Select all.
2. Click on Compress.
3. Select first option Zip Archive.
4. Click on Compress file button.

Then a zip file will be generated there..like

zip file in cpanel

Zip file name will be different for you. Now you can download the file to your PC/Laptop.

Now the next step to download the used database to your wordpress website.

Here is how you can download the correct database if there are more then 1 database in your hosting.

Click here to find your correct database used for your wordpress website.

So now You have both things…

Your website file + database.

Like this you can make backup of your website when you want.

Thanks 🙏

CF7 Submit form return error ‘The date format is incorrect’

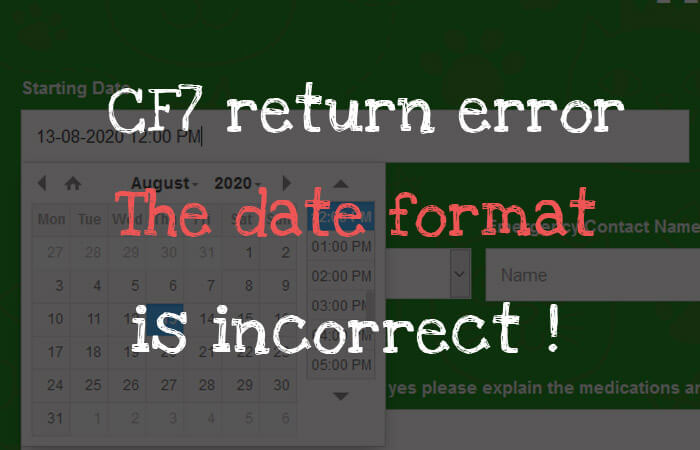
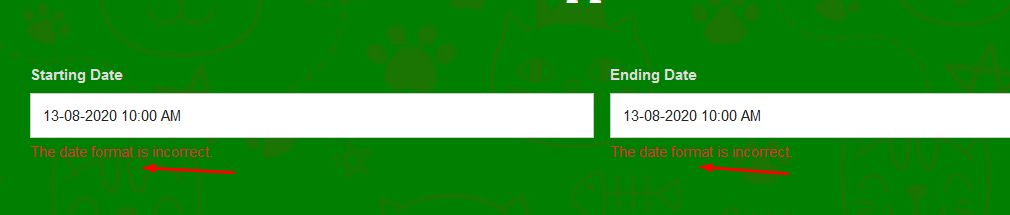
Contact form 7 plugin form return an error on date field that is “The date format is incorrect” … Even same error while using plugin Date Time Picker Field in forms.

the date format is incorrect

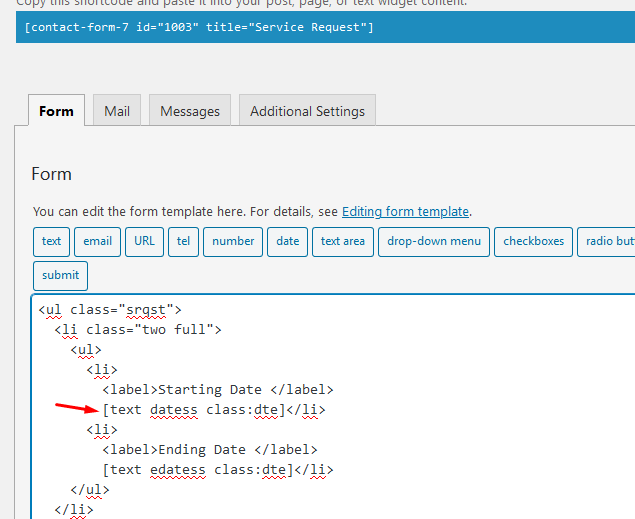
Here is the simple way to solve The date format is incorrect.. issue of forms.

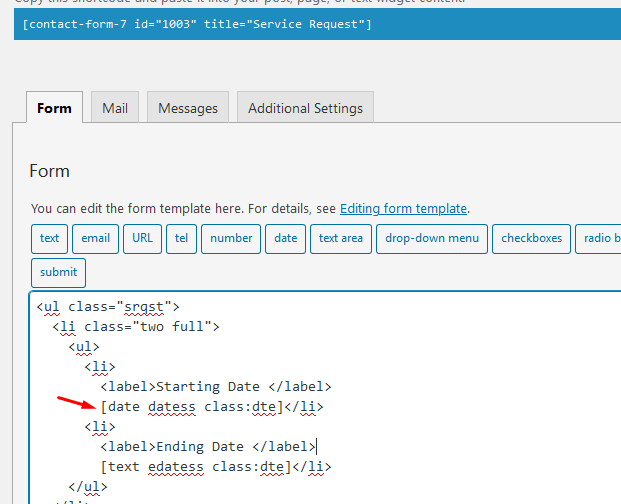
Edit your form in contact form window.. and reach near the date field… like here

edit contact form 7 form

Change [date to [text .. like here…

the date format is incorrect

Now hit save and check your form in pages..

contact form 7

Front view of forms… Dates are selected Now..

contact form 7 date

Let’s hit on Send button now….

no error now

There are no error’s now …. Cheers !

I hope this will help you…

Thanks

Change title “Additional Information” in woocommerce checkout page

Here is the way to change the heading title “Additional Information“of checkout page to whatever you give title.

Change title “Additional Information” in woo-commerce checkout page to “Personal Information” by overriding the template file like this..

Steps:-

Login to you Hosting cPanel or connect through FTP to your website files or you can do these steps by using any File Manager plugins.

Go to woocommerce plugin folder under directory plugins.

Then visit here “/wp-content/plugins/woocommerce/templates/checkout”

woocommerce checkout page change

Copy the form-shipping.php file and paste here.

In your theme create checkout folder and paste/upload there.

change woocommerce checkout

Open this folder and upload or paste that file here..

woocommerce form shipping additional information change

Now edit this file and find “Additional information” in the file and change it to whatever you want.. I changed this to Personal Information.

additional information checkout change

Now save the file and check the result in the checkout page.

checkout change additional information

Thanks

How to add an Authorize Payment method to WP website

Here is the way to add and configure an Authorize.net Payment Form method to WordPress website mostly using woo-commerce plugin.

Here is one of the plugin Authorize.net Payment Gateway For WooCommerce that help to add authorize payment method to website.

After added this plugin to website… Activate it and go to its settings ..

authorize net settings

New window will be like this.. and follow the steps as per screenshot below…

Steps:-

1) Enable this button and scroll down near to Login ID

2) You have to add Login ID and Transaction Key and Signature Key as mentioned in screenshot from your Authorize.net account.

authorize .net dashboard settings woocommerce wordrpess

Here is the previous post to get Login ID and Transaction Key and Signature Key from the Authorize.net account.

After adding all the Keys there in plugin settings.. hit on save button and check your payment method on checkout page.

It will show like this on your website.

authorize payment method woocommerce

I hope this will help you and for further help or information you can Contact with me using chat box or contact form.

Thanks 🙏

Click to Chat